Wanting to learn how to do glue assist method? Watch our guide below to learn why you should glue and nail hardwood floors that are wide, thin, or in environments with moisture swings.
One of the biggest complaints people have with a wood floor is squeaks, creaks, and other noises. We have a lot of great resources on how to fix a creaky floor problem (see them all here). But, it is even better to prevent wood floor squeaks in the first place.
The main principle to understand: movement causes squeaks. If you stop a wood floor from moving, you are less likely to have noise problems.
When a floor is nailed down, normal seasonal expansion and contraction of the wood loosen the nails over time. Loose nails and loose boards will cause squeaks. Both of these problems are common and sometimes unavoidable.
Because of these issues, we recommend a glue assist method for every nailed down wood floor. Keep reading to learn how to use a glue assist.
What is a glue assist method?
A glue assist simply means you are using adhesive to help the fasteners (cleats or staples) hold the flooring to the subfloor.
Using glue in addition to the fasteners when nailing down wide plank flooring over a plywood subfloor will ensure the board is fully secured to the floor.

Why should you use a glue assist?
We recommend and encourage a glue assist for all nailed down floors, especially if you are nailing down a thin floor, a solid or engineered floor that is 5” or wider, or one installed in an environment with moisture swings. These types of floors are more likely to have problems with squeaks.
Why is a glue assist often required for wide plank floors?
While wide plank floors are incredibly popular in today’s homes, the reality is that these floors also can develop more gaps. The wider the board, the more potential movement per board there could be on the floor. And as we’ve talked about, the more movement you see, the more squeaks you’ll hear.
Widths commonly exceeding 4 inches have a greater distance between the tongue and groove across each individual board. The tongue-side of the board is held in place by staples or cleats. But, the groove-side is typically only held by the tongue of the adjacent board that fits inside of it.
Wide planks have these free groove-sides that are further from the fastener holding its opposite side down.
As seasons and moisture conditions change, these wide boards can shrink and/or expand. This may result in movement in the floor, which can cause a loosening of the fit between the boards’ groove and the fastened adjacent tongue which holds it in place.
Symptoms of movement, environmental, and size changes can include:
- Squeaks, creaks, and other noises
- Gaps or voids between flooring boards
- Uneven and edge-peaked flooring
- Boards coming loose as the staples or cleats lose their holding power
Adding glue in addition to staples or cleats creates more holding power across the full width of each board to fasten the wide plank floor to the subfloor.
While changes in the environment or moisture levels can still affect the flooring, there will be less chance of movement which will help reduce squeaking, gaps, and loose boards.
How you can use a glue assist
There are several acceptable methods to use a glue assist, but it is very important to evaluate the total job site conditions in order to choose the best method. Watch our Technical Expert demonstrate our three recommended methods.
Caution: a glue assist will not prevent a floor from moving when job site or home conditions fall outside the NWFA or manufacturer’s recommendations. Always follow the flooring and adhesive manufacturer’s instructions or NWFA installation guidelines when installing a wood floor.
Installing a floor over a conditioned lower level or basement.
When air conditions can be properly maintained both above and below the floor, a glue assist can be used without a vapor retarder (underlayment).
This is important because the adhesive will need to be in direct contact with the subfloor.
According to the NWFA, humidity levels above and below unfinished solid wide plank flooring should be kept between 30-50%. Additionally, the moisture content of the flooring should be within 2% of the sub-flooring before installation.
If these conditions cannot be maintained (or if you are installing a floor over an unconditioned basement or crawl space) you need to take extra steps to address moisture issues. We recommend rolling on a moisture barrier prior to installing wood floor with a glue-assist method.
If those conditions can be met and maintained, the following glue assist methods can be used:
Option 1 (Serpentine pattern) – Good
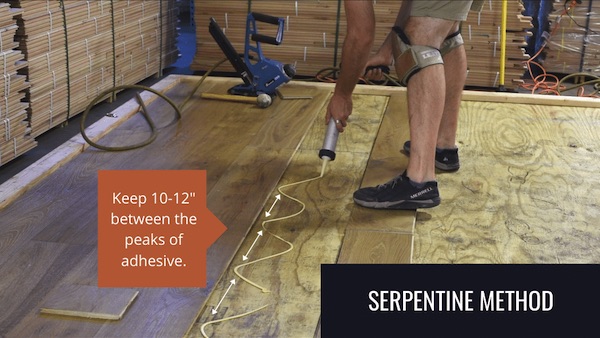
Use tubes of urethane, modified silane, or other recommended wood flooring glue. Apply a 1/8” or greater bead of glue in a serpentine pattern on the back of the boards or on subfloor where the board will be placed.
The serpentine pattern should have approximately 10”-12” between the peaks of the adhesive.
Follow the NWFA or Manufacturer’s recommended nailing schedule.
Option 2 (Trowel glue lines perpendicular to the flooring) – Best
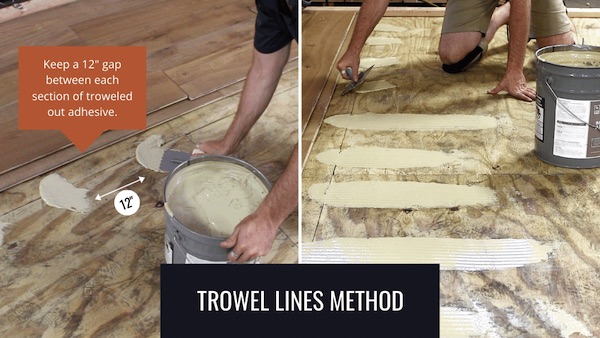
Use a urethane, modified silane, or other recommended wood flooring adhesive bucket and the correct trowel. Pull straight glue lines on the subfloor that are perpendicular to the flooring boards.
Leave no more than a 12” gap between each section of troweled out adhesive.
Follow the NWFA or Manufacturer’s recommended nailing schedule.
Option 3 (full trowel gluing) – Best
Use a urethane, modified silane, or other recommended wood flooring adhesive bucket and the correct trowel. Spread glue over the entire subfloor in accordance with the adhesive manufacturer’s instructions.
Follow the NWFA or Manufacturer’s recommended nailing schedule.
While some consider this an extreme option, it is reasonable to use when moisture conditions around the floor have greater changes. It also is a great way to glue and nail wide plank flooring, especially when the boards are over 5″ wide.
This is especially useful in places that have large seasonal swings in temperature and humidity. Additionally, a glue assist is great for floors that are installed over unconditioned spaces or on old subfloors that are likely to move.
Why using a glue assist method can save your business
The vast majority of complaints we see are related to moisture and movement.
Excess moisture or dry conditions cause wood flooring boards to move, creating painful symptoms for the homeowner:
- Squeaky, creaky, and noisy floors that homeowners can’t stand
- Unsightly gaps or cracks between flooring boards that stick out like a sore thumb
- Uneven and edge-peaked flooring
- Loose boards that have to be replaced
All of these symptoms are job site related. No flooring manufacturer warranties their flooring for these job site environmental related issues.
Using a proper glue assist method, along with maintaining appropriate conditions in the home, greatly reduces the chances of these issues calling you back to the job site to do expensive repairs.
By using the best installation practices and educating your customers, you can set your business apart, get great referrals, and reduce your time spent fixing problems.
Using a glue assist will save you money and make you profitable, too
Using a glue assist will add to the cost of materials and installation time for your jobs. However, this peace of mind should be worth the time and expense for you and your customer.
We recommend building the material cost into your bid for every job – and using a glue assist on every job it is recommended for.
Take the time to educate the customer on why it’s important and how it can save them from the problems described above. By doing this, you are very likely to profitably up-sell them on the labor and materials for this added insurance and peace of mind.
Need to find the materials for a glue assist hardwood installation?
We can help! From the flooring to the glue to a nailer, we are your go-to supplier with everything you need for a glue assist. Call one of our Midwest locations to get a quote!