Watch our video “How to Replace One Board In A Floor”:
Do you need to remove a problem board in your floor? Our new how-to video will take you step-by-step-through the process of removing a single board in the floor and replacing it like nothing ever happened!
We get it – stuff happens. Water damage, unfixable scratches, dents, etc. It’s frustrating to see a beautiful floor with that one board causing an eyesore. Our step-by-step tutorial will give you the tools and know-how to solve the problem yourself.
Why Should I Take Time To Replace One Bad Board?
Simple: It’s a quick repair that costs you little to no money depending on your tools. If you have the means for the repair, you won’t regret taking the time to remove that ugly board and restore your floor’s beauty.
How To Replace One Board In A Floor
Below is a list of the tools you’ll need:
- Replacement board
- Circular saw or Track saw
- Chisel
- Mallet
- Pry bar
- Measuring tape
- Pencil
- Blade/Knife
- Scraper
- Wood flooring glue
- Vacuum
- OPTIONAL: Nailer & wood filler
- OPTIONAL: Multi-tool
Step 1: Choose Your Replacement Board
Before you begin cutting into your floor, make sure you have a replacement board pre-selected. This board should be the size of the board you’re taking out. If you’re working with solid flooring, you’ll want to select a board longer than the piece you’re taking out.
TOOL TIPS: Benefits Of Using A Track Saw
In our video, we used a Makita track saw to cut our damaged board out. If you don’t have access to a track saw, a circular saw will get the job done. However, there are several benefits to using a track saw for this particular job:
- DUST CONTAINMENT – You can attach a vacuum to catch saw dust, leaving you with less to clean up.
- ABILITY TO SET SAW DEPTH – You can adjust the depth of the cut and ensure you cut out your board without causing damage to the subfloor.
- TRACK FOR THE SAW TO FOLLOW – This helps you get a straight, precise cut.
- TRACK PREVENTS SCRATCHING – This track prevents you from scratching other boards while you work.
Step 2: Find the Tongue’s Position
Take a look around the edge of the floor to determine which way the tongue is pointing. You may have to remove a base board to do this. Nonetheless, it’s crucial before cutting to know the position of the tongue.
Step 3: Adjust Depth of the Cut
Place your saw on the replacement board and use the board as a gauge for depth. This approach allows you to get the appropriate depth of the cut while also avoiding scratches on other boards. Lower your saw down until it touches the board you’re replacing and adjust your depth settings accordingly. Now your saw is set to cut the exact depth you need to remove the board without ripping in to the subfloor.
Step 4-5: Mark Your Cuts & Make Cut #1
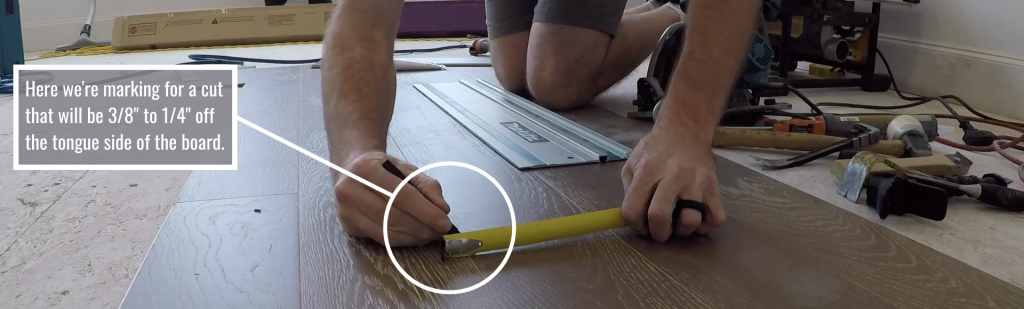
The first cut we make will be along the tongue side of the board. Our goal is to cut through all the staples or fasteners in that piece of flooring.
Keep in mind that the thinner the material is, the closer to the tongue you’re going to cut. For example, if we’re working with a thicker floor, such as a 3/4″ floor, we would back off the tongue a little more. However, the material we’re working with in the video is thinner, so we marked for our first cut about 3/8″ to 1/4″ from the side of the board.
After you’ve made your marks, you can make your first cut that will go along the tongue side of the board. When positioning your saw, make sure if you bump it or nudge it that you double check your saw has not moved off it’s mark. Once you have it properly positioned, go ahead and make your first cut!
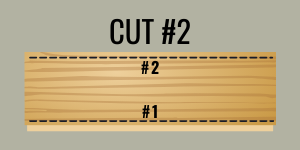
Step 6-7: Make Cut #2 & Cut #3
For our second cut, we’ll be cutting alongside the backside of the board. This cut does not have to be as precise as the first. Once we complete this, we will make a third cut that goes diagonal across the board between the first and second cuts. This will help us remove the board in the next step.


Step 8-10: Chisel Corners, Remove Board, & Chisel Edges
With all of our cuts completed, we’re ready to remove the board from the floor!
Take your chisel and mallet to each corner of the board to loosen it. Once it’s loose, take a chisel and pry bar to the cuts to pull the two triangular pieces of the board out from the floor. Be careful to not pull the boards up too far as you’re removing it in order to avoid breaking off the tongue or groove of the adjacent boards.
After both pieces of the board are removed, use a chisel to break off and remove all the edge pieces that were on the other side of your cut. When possible, use a dull tool to avoid damaging other boards. If there are any staples or fasteners you missed you can cut them easily using a multi-tool or you can carefully use your chisel and pry bar.
Step 11: Clean and Prep Subfloor
Use a blade/knife to remove the underlayment and reveal the subfloor. Before we glue our replacement board in, we need to have a clean subfloor. To do this, we’ll take a wood scraper and scrape the floor down to the raw subfloor.
Vacuum up all the shavings and have this area as clean as possible, removing all potential obstructions so our replacement board can be placed flush with the floor.
Step 12-13: Make Cuts On New Board & Dry Fit Into Floor
In order to fit our replacement board in the floor, we need to make a couple modifications to the board. First, we’ll cut off the tongue on the end, followed by cutting off the bottom of the groove around the entire board.
Once your cuts are made, dry fit the board into the hole to ensure it fits and your cuts are all properly done. Check that it’s flesh with the floor and then carefully take the board back out of the whole.
Step 14: Glue Board to Subfloor
Before gluing, make sure you are using glue specifically made for hardwood flooring. Apply your glue around the edge of the board first, followed by a zig-zag pattern down the middle of the entire board.
Carefully reinsert the board into the floor. If you’re just gluing, you can place weights on the board for an extended period of time until the glue dries. Depending on the floor, you can also nail the board into the floor. Keep in mind if you use a nailer you will need to fill those nail holes with wood filler.

And we’re done! You’ve successfully taken that ugly, damaged board straight out of the middle of the floor and replaced it like no repair even happened. Hopefully this instructional was helpful for you and your floor!
Want to watch the how-to video? Click here!
Have any other damage on your floor and want to try your hand at repairing it? Check out our Youtube channel! We have several How-To videos including:
Fix A White Flooring Scratch:
Click here to read our article
How To Fix A Chipped Wood Floor:
Click here to read our article
Quick Fix For Squeaky Floors With WD-40: