
Watch our tutorial video for How To Make Stairs With Prefinished Flooring!
Subscribe to our Youtube Channel to get notifications of new videos!
When installing a floor, accessories like vents or trim pieces can really make the floor stand out.
Having a matching staircase to the floor is also a beautiful accompaniment to a new floor, but it can often be hard to match the treads perfectly to the surrounding floor.
Typically wood staircases are created with unfinished treads and parts that are stained to match the floor. If the floor is a prefinished one, it takes a lot of trial and error to formulate a stain that matches exactly. Plus, you still need to go through the sand and finish process – sanding, staining, and finishing the treads – before you can install.
What if you could eliminate steps to create exact match treads?
This is where FloorMade Parts and Patterns comes into play.
FloorMade uses prefinished flooring to hand craft stairs parts that perfectly match the surrounding floor. Get more details about FloorMade here (they also make treads out of prefinished flooring too).
We used Real Wood Floors prefinished flooring and FloorMade to create a perfect match staircase.
Keep reading to learn how to create and install custom prefinished floor treads and risers.
Materials We Used For This Stair Tread Installation:
- Prefinished Flooring and FloorMade Nosing
- Measuring Tape
- Stair Jig
- Track Saw and Vacuum – We used the Makita Track Saw
- Finish Nailer
- Wood Floor Glue
We set up a workspace with a piece of scrap MDF on a table, and nailed down flooring pieces to the MDF sheet. This gave us a guide to mockup the treads each time we cut.
There are a lot of different tools that you can use with this job, these are the ones that we found to be the most helpful.
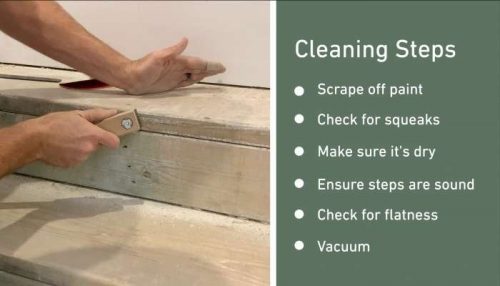
Prep the Staircase
Clean the stairs of any overspray, dirt and dust. Inspect that there are no squeaks or any other problems with the staircase – it should be clean, dry, flat and sound. Do a final vacuum and then you’re ready to start creating the stairs.
Creating Closed Stair Treads
Keep reading to learn how to DIY stair treads for a stair tread installation on a closed staircase.
1. Measure Treads and Sort Flooring
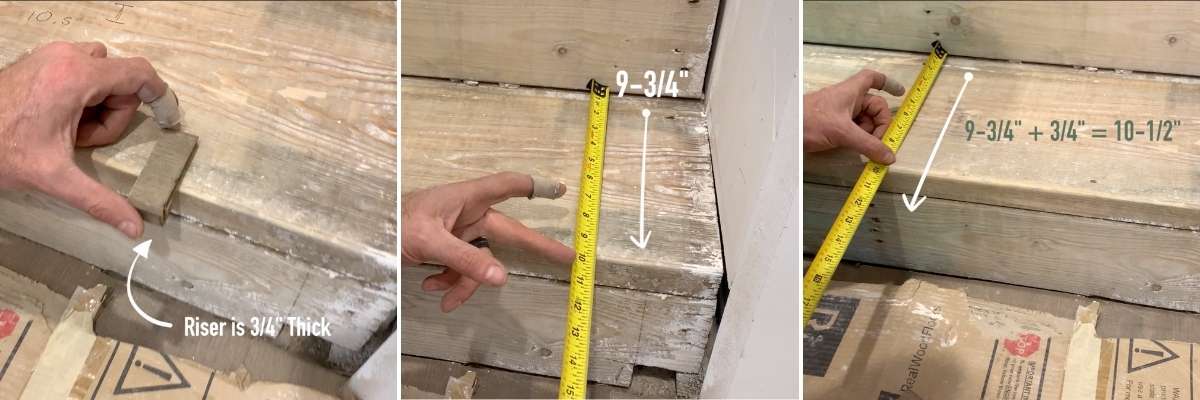
Measure: Start by using a stair jig and measuring tape to measure the width and length of the treads. You’ll want to measure each tread, because many staircases have slightly different dimensions for each tread. As you measure, keep in mind the thickness of the riser. You can place your riser material where it will fit on the staircase to get an accurate measurement. Our riser material was standard ¾”, so we added this dimension to our tread width so that the tread would extend over the riser.
Sort: Once you have your treads measured, sort through your prefinished flooring for lengths that are long enough for your treads. Keep the extra boards that are too short – these can be used in closets or mixed in with the rest of the flooring installation.
2. Construct the Treads
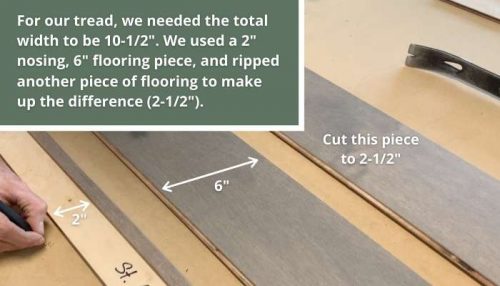
Before you construct your wood stair treads, you’ll need to determine how you’ll create the tread with your FloorMade nosing. For ours, we used two pieces of flooring behind the stair nose. We kept one board the original width of the floor and ripped a second piece to make up the difference.
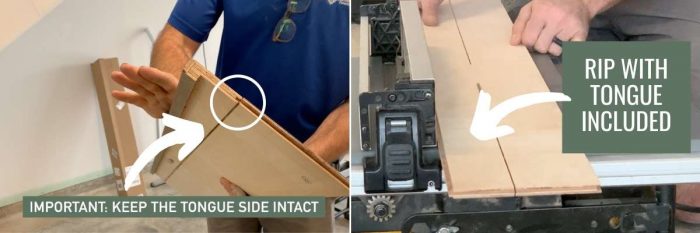
After you decide how to construct the stair tread, measure and mark the flooring to the right width and rip the flooring to that mark. Before you rip, remember to leave all of the tongues intact so that they fully engage with the nosing. That will help to keep the nosing in place with foot traffic on the tread.
Once you have ripped the pieces you need, you can keep the other half of the pieces (with the groove sides) to create the risers.
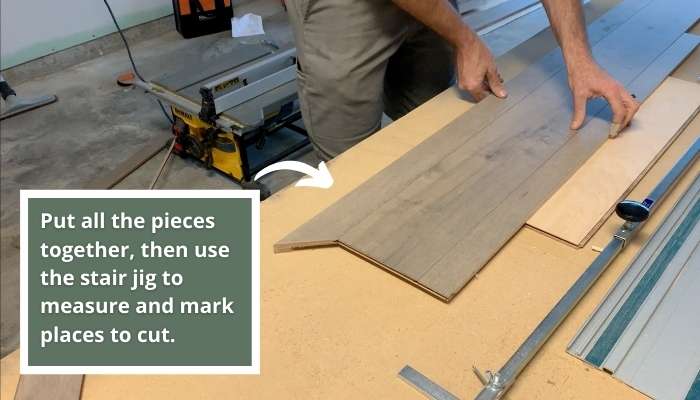
3. Measure and Cut Treads
We’ve set up our workspace so we can fit all the pieces together on two scrap pieces of flooring that we’ve nailed down to our scrap MDF sheet.
Using this setup, you can make all of your cuts in just two runs:
Dry fit the floor to the nosing to create a mock-up of what the tread is actually going to look like. Place the tread on the scrap piece of flooring and use your stair jig measurement to double check the length and width. If you’ve tapped the stair jig or it’s out of line, go back and re-measure the tread to make sure your measurements are correct.
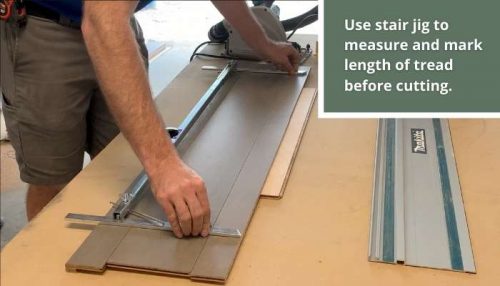
Use the stair jig to mark the correct length on both sides. Now we’re ready to cut!
If using a track saw, get the guide as close in as possible. Once you’re done cutting, take the tread and dry fit it into the space to make sure it’s the right size.
Repeat all of these steps for each tread before installing.
Creating Open Treads with a Return
Use the following instructions to create treads that are open and have a return.
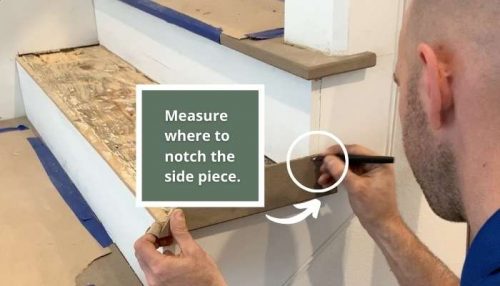
1. Make Side Return Piece
Measure how long the return is past the skirting. Add this measurement to the tread width and the nosing width. For ours, we found that it was 1-1/2” past the skirting. We added this to the tread width, 10”, plus ¾” that the nosing sticks out. This made the total width of our tread 12-1/4”, which means that the side piece needs to be 12-1/4” long.

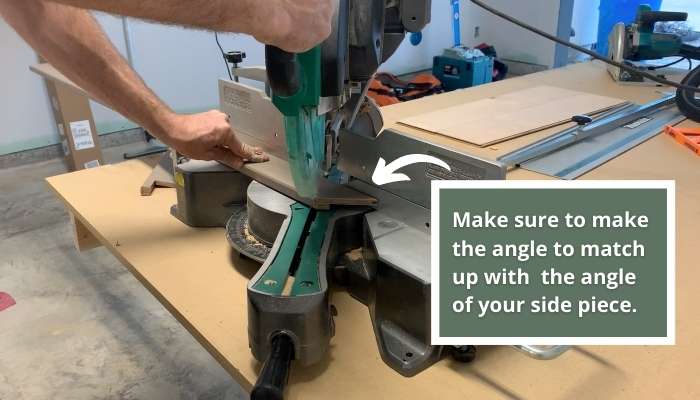
Cut your side piece to the length that matches the width of your tread, then cut one end to a 45-degree angle. This should be the end that will meet up with the nosing.
Next, notch out the back of this for the return that extends past the skirting. You can do that with a measuring tape or place the piece up against the staircase and mark the space to notch.
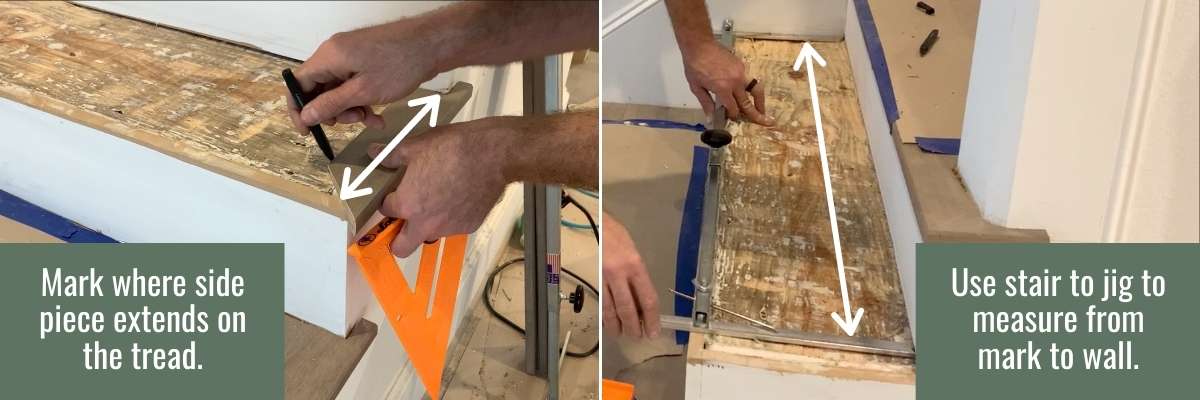
2. Measure and Cut Nosing
After the return piece is notched, you’ll need to cut your nosing to length. Take the side piece back to your tread and mark where it sits on the tread. From that mark to the wall, measure the length with a stair jig. This will be the length of your stair nose.
Cut your nosing to length, creating a 45 degree angle on the side that will meet the return.
3. Create the Tread
As we did with the closed tread, measure and determine how wide the back pieces need to be. Rip that back piece, then assemble with your flooring. Keep in mind whether you need to cut with the tongue or the groove.
Like the open tread, you can do all the cuts in just two runs. Dry fit the nosing and flooring pieces together, note that you won’t need to dry fit the side return piece. Put the tread on the scrap piece of flooring and double check the length and width. Use the stair jig to mark the correct length on both sides.
Again, get the guide of the track saw as close to your marks as you can. Cut and take the tread and side return piece to fit it into the space. Repeat these steps for every open tread.
Creating a Stair Riser with MDF
1. Measure
Start at the bottom riser and work your way to the top. Take your stair jig and measure out the sides of that first riser, then use a measuring tape to measure the height of the riser.
2. Cut
Use the stair jig to measure your cut lines. Also, put a note on the riser which way is up to know what the front of your riser is. Cut the piece to length and fit it into the space.
If using MDF risers for the whole staircase, repeat these steps for each riser.
Creating Stair Risers with Prefinished Flooring
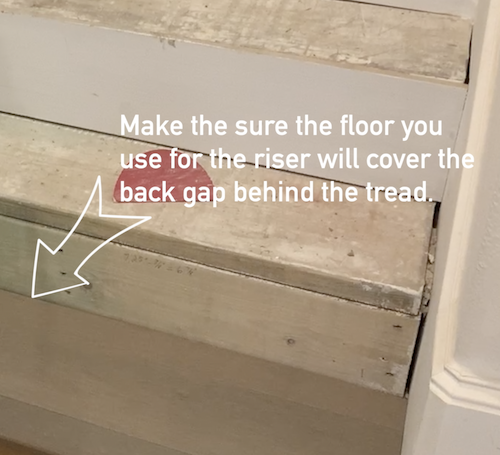
1. Measure Riser
When using flooring as a riser, make sure the back gap on the tread is less than the thickness of your flooring piece used for the riser. Take one of your treads to the staircase and dry fit to see how big the back gap is.
Put your first tread in, then measure the height with a measuring tape and length with your stair jig.
2. Create Riser
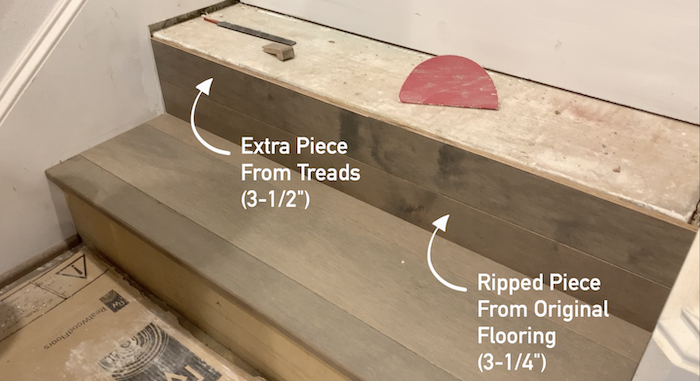
To get the maximum yield out of the flooring, use the cut off pieces from making the treads. With these pieces and your flooring, calculate how much more you need to rip to get the height of your riser material. In this case, we used 6” flooring, and our finished riser needed to be 6-3/4”. Our leftover material from the treads was 3-1/2”, so we subtracted that from 6-3/4” to get 3-1/4”. To make up that 3-1/4”, we ripped a 3-1/4” piece from our 6” flooring.
Before cutting, remember that you will want to keep the tongue side to fit into the groove. When you have your second piece ripped down for your riser, combine with your rip from earlier and measure to make sure that they make the correct riser height.
3. Measure and Cut
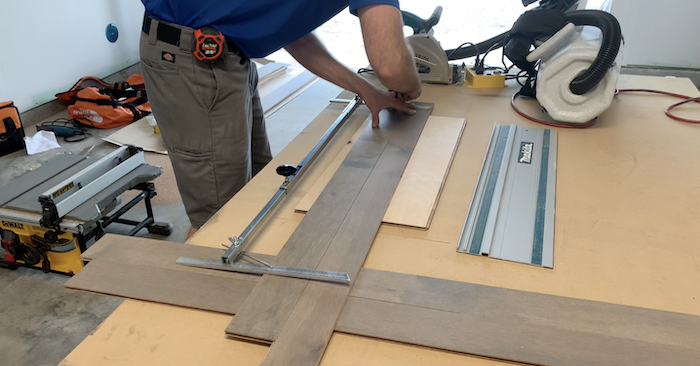
Put both pieces of your riser together and measure the height to make sure that it’s correct. Then, take your stair jig, lay it on your riser, mark your lines and cut to length. Once cut, take to your staircase and fit in place.
Repeat these steps for each riser.
Installing Treads and Risers
When everything is cut, you can begin to glue and nail the pieces in place. Typically, you do this in a riser tread combination – cut a riser, cut a tread, then glue and nail the riser and glue and nail the tread.
We recommend using both wood floor glue and nails. This is the most secure way to hold everything in place since stairs get a lot of foot traffic. Always use a glue that’s designed specifically for flooring. Wood floor glue stretches and flexes underfoot without getting brittle and breaking over time like non-wood floor glues. Using the right glue will prevent treads and risers from coming out later on.
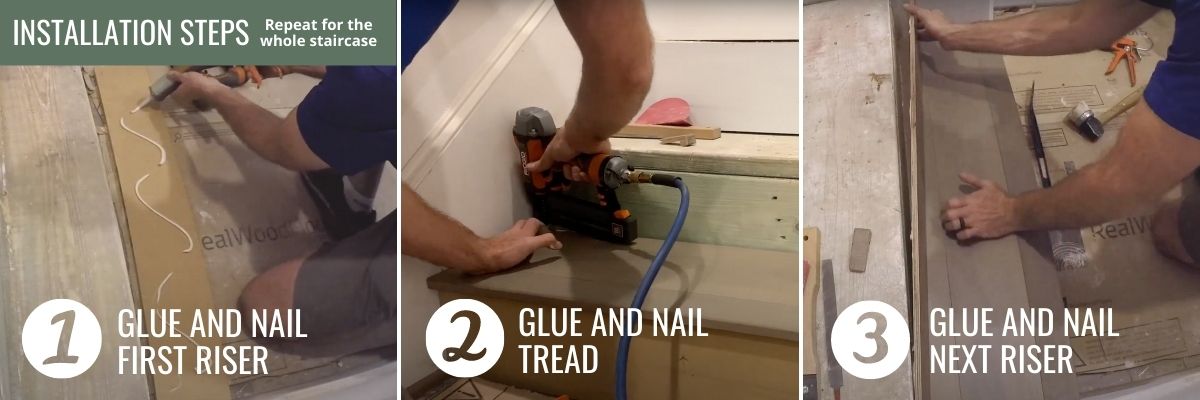
1. Glue and Nail First Riser
The first thing to do with your riser is to spread a serpentine pattern of glue. Press it firmly down and check that you’re flush on the subfloor. Then nail the sides, being sure to nail in the middle where the stringer is.
2. Glue and Nail Stair Tread Installation
Next up: the stair tread installation. Although we’ll glue and nail these, we use two different methods for closed treads and open treads with a return.
Closed Tread
If using closed treads, be sure to put plenty of glue under where the floor made nosing. This will secure the weakest part of the tread where there will be the most pressure from foot traffic.
Next, nail along the FloorMade nosing and make sure all of the seams are pulled tight. You also will want to nail with the stringer in the middle of the tread. Put a couple nails on the backside to secure everything in place.
Open Tread
Step 1 – For an open tread, put glue on the step and spread it across with the trowel. This is the best way of holding the tread in place because the return has a groove going into the groove of the stair nosing.
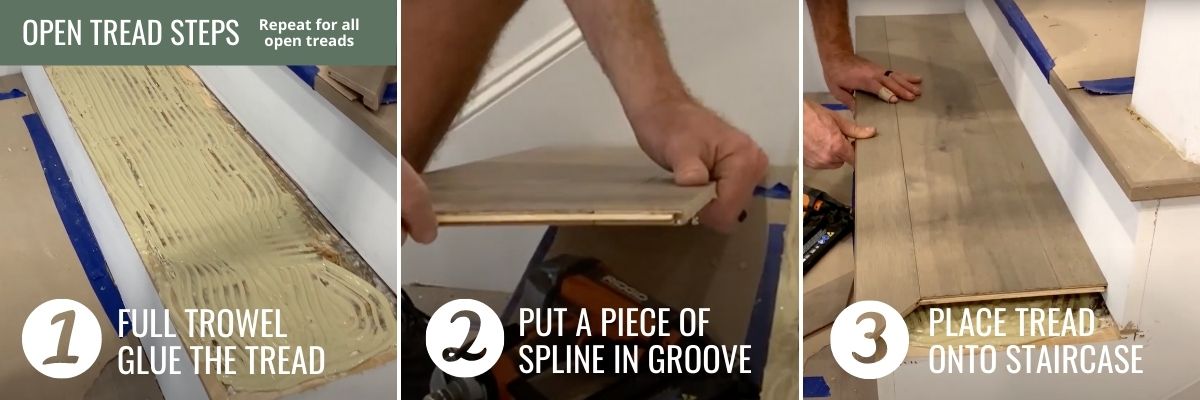
Step 2 – Before putting down the tread and return pieces, make a piece of spline to be glued into the groove on the return piece. This will hold the return secure and keep it level with the tread and nosing.
Step 3 – Next, set the tread down in the glue and press it firmly so that it has full contact all across the tread. Place the return onto the tread and work it into the spline. Make sure that it is level where the outer edge nail will go.
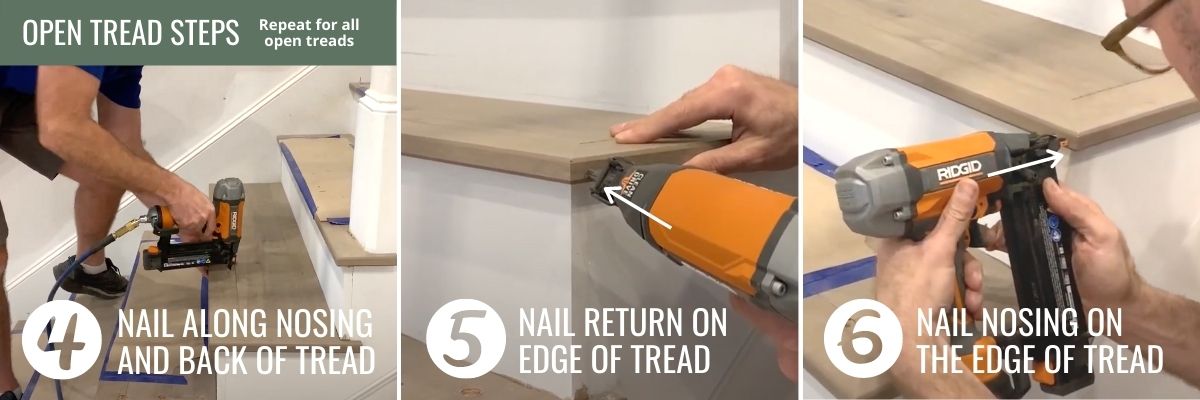
Step 4 – After it is level and secure with the glue, nail the tread together. For thin material like we used and on corners, use an 18-gauge brad nailer or a 23-gauge pin nailer. Don’t use a nailer that is too big, otherwise it could split out of the top or bottom of the tread.
Step 5 and 6 – Nail the corner of the tread, nosing, and return to keep everything level and secure. The best method: put one nail through the side and one through the front. Be careful of how you hold the pieces together; do not put your hand in the direction that the nail is shooting in case it deflects up. Additionally, make sure you go straight in the riser so the nail doesn’t pop out the top or bottom of the tread.
After nailing the return piece, nail the tread along the front and back to hold everything secure. Be sure to nail the nosing well to keep it in place.
3. Glue and Nail Next Riser
If you’re using the flooring for the riser, you’re still going to put glue down on the back of it, put it up and tack it in with nails to hold it as that glue sets up.
Repeat these steps for each riser and tread.
When complete, look over the stairs for any touch-ups or areas to fix.
Hi there, we’ve had engineered wood stairs installed, and I’m getting a bit concerned that as the edges wear they will start to tear, it’s there a wax or something that can be used to protect the edges?
Hi Sir!
I Hope you are doing well. Yesterday I was looking for a solution regarding flooring and fortunately, found your blog ( https://themasterscraft.com/how-to-make-stairs-with-prefinished-flooring/ ), you have shared some excellent detail about flooring than anyone who write about it. I like this very much. Your post inspired me very much.